
I have a VPS on the internet which has a public IP address. I have never been a great fan of exposing SSH and other services which only I need access to. Normally I lock down the firewalls on the VPS for the services to a static Public IP address i will be sitting behind, normally my home broadband connection or my work office. Lately i have been traveling a lot and need to access one of these services but did not have acess to come from one of these static Public IP address.
I would like to set up a simple Client to Server VPN Configuration, so i don’t need to come from a static public IP address. I heard of Wireguard at Oggcamp and thought I’d give it a go.
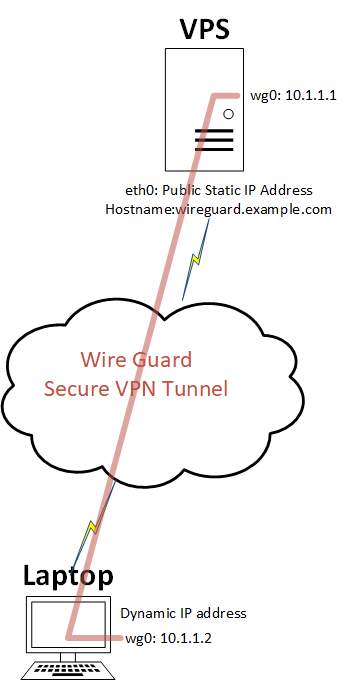
Above I show a diagram of the setup this guide provides.
I have a Ubuntu 16.04 server with a public IP address and a laptop running Ubuntu which is behind router with a dynamic public IP Address and the laptop has been given a internal IP address via DHCP.
We will:
- install wireguard on both the server and laptop
- create a wireguard network interface on them
- generate keys on both server and laptop
- create the config on both server and laptop
- enable firewall rules and IP forwarding the server
- test connectivity between the server and laptop
Install Wireguard
Add the Wireguard repository to your sources list on both devices.
sudo add-apt-repository ppa:wireguard/wireguard
Install Wireguard on both devices. The wireguard package will install all necessary dependencies.
sudo apt-get update
sudo apt install wireguard
Generate Configs
On the server and laptop create the public and private keys.
umask 077
wg genkey | tee privatekey | wg pubkey > publickey
Take a note of each of the private and public key on both devices
cat publickey
cat privatekey
On the server create the config file
sudo vi /etc/wireguard/wg0.conf
Add the following information and replacing the PrivateKey and PublicKey from the output of the notes you take in the previous step.
[Interface]
Address = 10.1.1.1/24
PrivateKey = ReplaceWithServerPrivateKey
ListenPort = 55555

[Peer]
PublicKey = ReplaceWithLaptopPublicKey
AllowedIPs = 10.1.1.2/32
On the client create the config file
sudo vi /etc/wireguard/wg0.conf
Add the following, replacing the PrivateKey and PublicKey from the output of the notes you take in the previous step and replace the Endpoint with the public IP address or Hostname of the server.
[Interface]
Address = 10.1.1.3/24
PrivateKey = ReplaceWithLaptopPrivateKey

[Peer]
PublicKey = ReplaceWithServerPublicKey
AllowedIPs = 10.1.1.0/24
Endpoint = wireguard.example.com:55555
PersistentKeepalive = 10
Edit firewall to allow port 55555 in. My VPS provides this so i edit the firewall rule via their portal. You may need to add this in your IP tables firewall rules.
On the server enable IP forwarding.
Edit file /etc/sysctl.conf uncommtend the following line.
net.ipv4.ip_forward=1
Run this command to make the change take effect.
sysctl -p
Testing
bring up the interface on each device.
sudo wg-quick up wg0
type to see the state of the interfaces
wg
From the laptop you should be able to ping 10.1.1.1
To make the wg0 interface come up on every boot, shutdown the wg0 interface.
wg-quick down wg0
Run the following cmd to enable the wireguard as systemd unit
systemctl enable wg-quick@wg0 ; systemctl start wg-quick@wg0